When it comes to homebrewing beer, one of the most common questions is whether you can pitch yeast two days after brewing. The short answer is yes, but there are some important considerations to keep in mind. Yeast is a living organism that needs time to acclimate to its new environment before it can begin fermenting the sugars in your wort. Pitching yeast too soon can lead to a sluggish fermentation, off-flavors, and even contamination. However, if you've properly prepared your yeast and wort, and you're using a high-quality yeast strain, you can pitch your yeast two days after brewing with good results. Just be sure to monitor the fermentation process closely and make any necessary adjustments to ensure a healthy and successful brew.
Explore related products


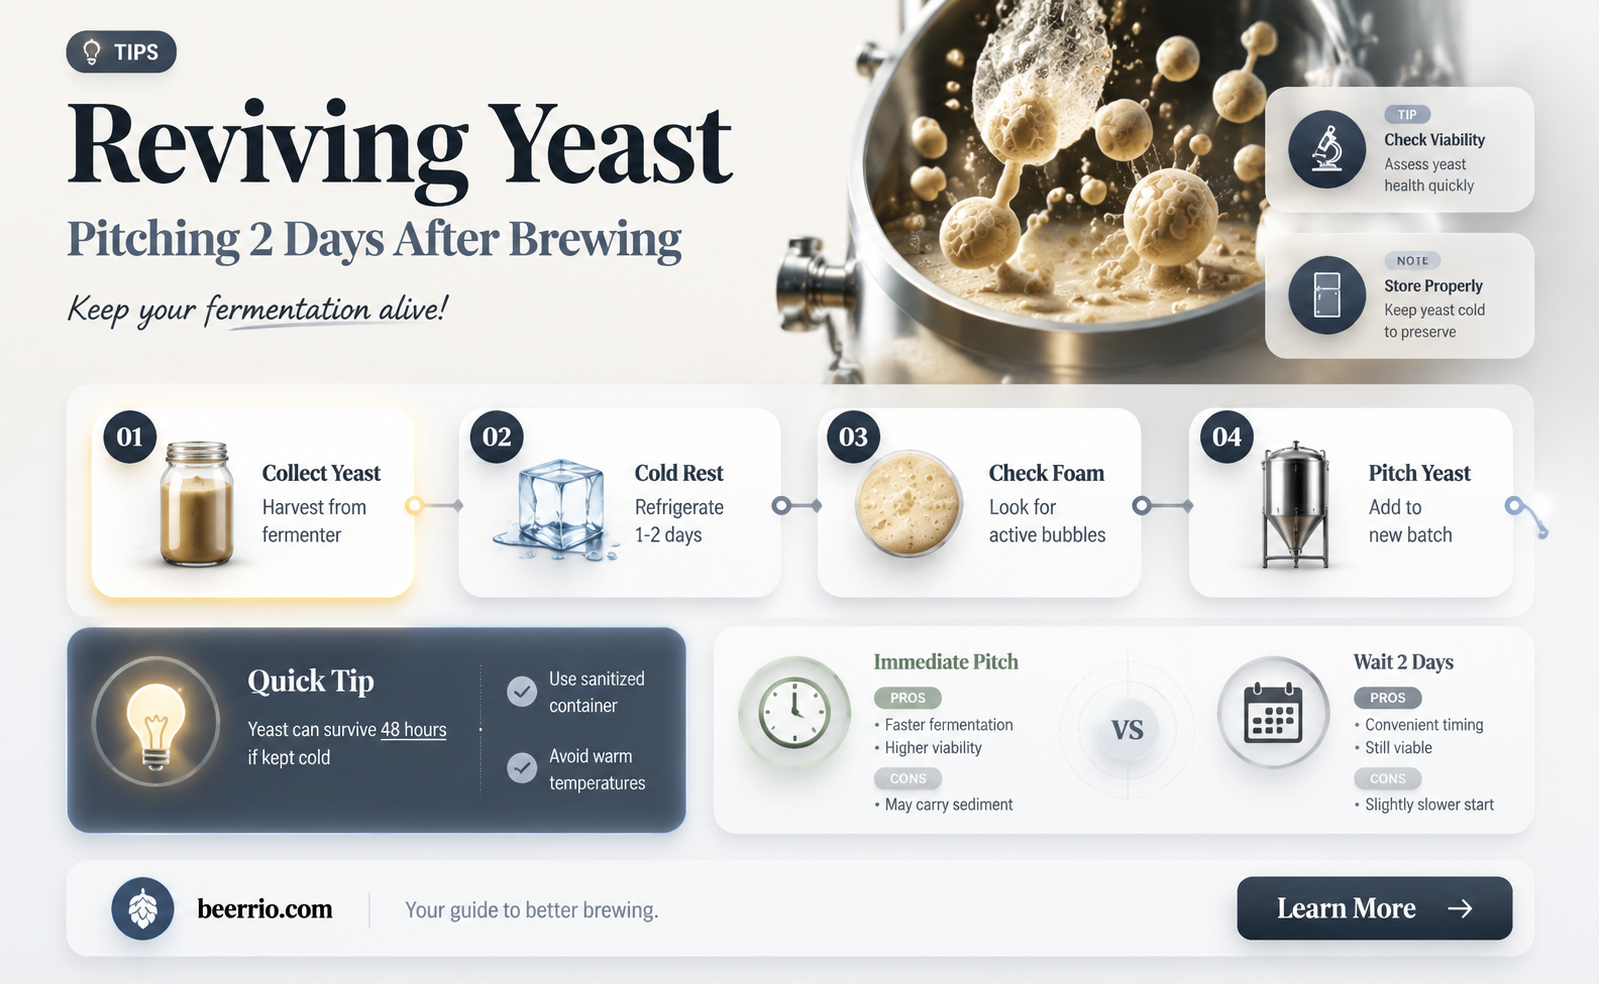
What You'll Learn
- Yeast Viability: Yeast's ability to ferment after two days depends on storage conditions and yeast strain
- Fermentation Risks: Delaying pitching can lead to contamination risks and off-flavors in the beer
- Optimal Pitching Time: Best practices suggest pitching yeast within 24 hours for optimal fermentation
- Yeast Rehydration: If yeast was dehydrated, rehydrate it properly before pitching to ensure viability
- Brewing Temperature: Ensure the wort is at the correct temperature range for the yeast strain used
![]()
Yeast Viability: Yeast's ability to ferment after two days depends on storage conditions and yeast strain
Yeast viability is a critical factor in determining the success of a beer brew, especially when considering pitching yeast two days after brewing. The ability of yeast to ferment effectively after this period largely depends on two key variables: storage conditions and yeast strain. Proper storage is paramount to maintaining yeast health. Yeast should be stored in a cool, dry place, ideally at temperatures between 40-50°F (4-10°C). Exposure to heat, light, and moisture can significantly reduce yeast viability. For instance, storing yeast at room temperature for extended periods can lead to a decrease in its ability to ferment sugars efficiently.
Different yeast strains also exhibit varying levels of viability over time. Some strains are more robust and can maintain their fermentative capabilities longer than others. For example, certain strains like Saccharomyces cerevisiae are known for their resilience and can often be reused in multiple brews with minimal loss in viability. On the other hand, more delicate strains may require more careful handling and may not perform as well after two days.
When pitching yeast two days after brewing, it's essential to assess its viability to ensure a successful fermentation. One common method to check yeast viability is the sugar test. This involves mixing a small amount of yeast with sugar and water and observing for signs of fermentation, such as the production of bubbles. If the yeast is still viable, it will typically show signs of activity within a few hours.
In addition to storage conditions and yeast strain, the brewing process itself can impact yeast viability. Factors such as the temperature of the wort, the presence of certain chemicals or compounds, and the overall cleanliness of the brewing equipment can all influence how well the yeast performs. For instance, pitching yeast into wort that is too hot can shock the yeast and reduce its viability. Similarly, the presence of contaminants can compete with yeast for nutrients and inhibit its growth.
To maximize yeast viability when pitching two days after brewing, brewers should focus on maintaining optimal storage conditions, selecting robust yeast strains, and ensuring a clean and controlled brewing environment. By taking these steps, brewers can help ensure that their yeast remains healthy and capable of producing high-quality beer.
Will Two Beers Affect Your Breathalyzer Test Results?
You may want to see also
Explore related products


![]()
Fermentation Risks: Delaying pitching can lead to contamination risks and off-flavors in the beer
Delaying the pitching of yeast in beer brewing can significantly increase the risk of contamination and the development of off-flavors. This is primarily due to the fact that the wort, which is the liquid extracted from the mashing process, is a rich medium for bacterial and wild yeast growth. If yeast is not pitched promptly, these unwanted microorganisms can take hold, leading to a range of issues that can compromise the quality of the final product.
One of the main risks associated with delayed pitching is the production of off-flavors. These can manifest in various ways, such as a sour or funky taste, which are indicative of bacterial contamination. For instance, lactic acid bacteria can convert sugars in the wort into lactic acid, resulting in a tart, unpleasant flavor profile. Similarly, wild yeasts can produce compounds like phenols and esters, which can impart undesirable flavors and aromas to the beer.
Another significant risk is the potential for spoilage. Certain bacteria, such as Clostridium botulinum, can produce toxins that not only spoil the beer but also pose health risks to consumers. While these bacteria are less common, their presence can be devastating to a batch of beer. Furthermore, the longer the wort sits without yeast, the more likely it is to become a breeding ground for a variety of spoilage organisms.
To mitigate these risks, it is crucial to pitch the yeast as soon as possible after the wort has been cooled to the appropriate temperature. This typically means pitching within a few hours of the wort being ready. By doing so, the yeast can quickly establish itself and begin the fermentation process, outcompeting any potential contaminants.
In cases where pitching cannot be done immediately, brewers can take steps to minimize the risk of contamination. This might include using a yeast starter to ensure a healthy, vigorous yeast culture is available for pitching, or employing sanitation techniques such as boiling the wort or using antimicrobial agents. However, these measures should be used in conjunction with prompt pitching, not as a substitute for it.
In conclusion, delaying the pitching of yeast in beer brewing can lead to a host of problems, including contamination and off-flavors. To ensure the best possible outcome, brewers should aim to pitch their yeast as soon as the wort is ready, and take additional precautions if necessary to maintain the integrity of their brew.
Sipping on Crypto: Where to Find Bitcoin-Friendly Bars
You may want to see also
Explore related products


![]()
Optimal Pitching Time: Best practices suggest pitching yeast within 24 hours for optimal fermentation
Pitching yeast is a critical step in the beer brewing process, and timing is essential for achieving the best results. Best practices recommend pitching yeast within 24 hours of brewing to ensure optimal fermentation. This timeframe allows the yeast to start working quickly, reducing the risk of contamination and off-flavors.
Waiting too long to pitch yeast can lead to a variety of issues. For example, if you wait 2 days after brewing, the wort may start to develop bacteria or wild yeast, which can compete with the brewing yeast and lead to unpredictable fermentation outcomes. Additionally, the wort's sugar levels may begin to drop, making it more difficult for the yeast to ferment properly.
To ensure the best results, it's important to prepare the yeast properly before pitching. This typically involves rehydrating the yeast in warm water for about 15-30 minutes, depending on the type of yeast. Once the yeast is rehydrated, it should be pitched into the wort at the appropriate temperature, usually between 65-75°F (18-24°C).
In some cases, brewers may choose to pitch yeast later than 24 hours after brewing. This might be due to scheduling constraints or the need to allow the wort to cool down further. However, it's important to note that this can increase the risk of contamination and may lead to longer fermentation times.
Ultimately, the optimal pitching time will depend on a variety of factors, including the type of beer being brewed, the yeast strain being used, and the brewing environment. By understanding these factors and following best practices, brewers can ensure that their yeast is pitched at the right time for optimal fermentation results.
Exploring the Flexibility of Homebrewing: Can You Pause After Wort?
You may want to see also
Explore related products


![One in a Mill Instant Dry Yeast | 1.1 LB (Pack Of 1) [IMPROVED] Fast Acting Self Rising Yeast for Baking Bread, Cake, Pizza Dough Crust | Kosher | Quick Rapid Rise Leavening Agent for Pastries](https://m.media-amazon.com/images/I/71frk5lZTFL._AC_UL320_.jpg)
![]()
Yeast Rehydration: If yeast was dehydrated, rehydrate it properly before pitching to ensure viability
Yeast rehydration is a critical step in the beer brewing process, especially when working with dehydrated yeast. Proper rehydration ensures that the yeast cells are viable and can perform fermentation effectively. If yeast is not rehydrated correctly, it may lead to poor fermentation, off-flavors, or even complete failure of the brew.
To rehydrate yeast, follow these steps: First, prepare a small amount of warm water, ideally between 90°F to 100°F (32°C to 38°C). The water should be free of chlorine and other chemicals that can harm the yeast. Next, gently sprinkle the dehydrated yeast into the water, ensuring that it is evenly distributed. Allow the yeast to sit for about 15 to 30 minutes, during which time it will absorb the water and swell.
After the rehydration period, the yeast should appear active and frothy. This is a good sign that the yeast cells are viable and ready for pitching. If the yeast does not show signs of activity, such as bubbling or a change in texture, it may be necessary to try rehydrating it again or using a different batch of yeast.
When pitching the rehydrated yeast into the wort, it is important to do so gently to avoid shocking the yeast cells. Slowly pour the yeast mixture into the wort, allowing it to mix naturally. Once the yeast is pitched, it is essential to monitor the fermentation process closely, watching for signs of activity such as bubbling or a drop in gravity.
In summary, proper yeast rehydration is crucial for a successful beer brew. By following the correct steps and paying close attention to the yeast's behavior, brewers can ensure that their yeast is viable and ready to ferment their beer effectively.
Exploring Online Payment Options for Manhattan Beer Purchases
You may want to see also
Explore related products


![]()
Brewing Temperature: Ensure the wort is at the correct temperature range for the yeast strain used
The brewing temperature is a critical factor when it comes to pitching yeast, as it directly affects the yeast's ability to ferment the wort effectively. Yeast strains have specific temperature ranges in which they thrive, and deviating from these ranges can lead to poor fermentation, off-flavors, or even yeast death. Typically, ale yeasts prefer temperatures between 60°F and 75°F (15°C and 24°C), while lager yeasts prefer cooler temperatures between 45°F and 55°F (7°C and 13°C).
To ensure the wort is at the correct temperature range for the yeast strain used, brewers should monitor the temperature closely during the brewing process. This can be done using a thermometer or a temperature controller. If the wort is too hot, it can be cooled down by transferring it to a fermenter and placing it in a cool environment or using a wort chiller. If the wort is too cold, it can be warmed up by placing the fermenter in a warmer environment or using a heating pad.
It's also important to consider the temperature of the yeast itself. Yeast should be stored at the appropriate temperature before pitching, and it should be acclimated to the wort temperature before being added. This can be done by mixing a small amount of the wort with the yeast and letting it sit for a few minutes before pitching the entire batch.
In the context of pitching yeast 2 days after brewing beer, it's crucial to maintain the correct brewing temperature throughout the entire process. This will ensure that the yeast is healthy and active when it's time to pitch, and it will also help to prevent any potential issues that could arise from temperature fluctuations. By following these guidelines, brewers can increase their chances of a successful fermentation and a high-quality final product.
Exploring the Flexibility of Homebrewing: Can You Pause After the Mash?
You may want to see also
Frequently asked questions
Yes, you can pitch yeast 2 days after brewing beer. This delay allows the wort to cool down and reduces the risk of killing the yeast with high temperatures.
Waiting 2 days before pitching yeast allows the wort to cool down, which is crucial for yeast survival. It also gives the wort time to settle and reduces the risk of contamination.
Pitching yeast too soon after brewing can result in yeast death due to high temperatures. This can lead to a failed fermentation and off-flavors in the final beer.
For high-gravity beers, it's recommended to wait at least 24-48 hours before pitching yeast. This allows the wort to cool down and reduces the risk of yeast stress and death.
Yes, you can pitch yeast 2 days after brewing regardless of the yeast type. However, it's important to note that different yeast strains may have different temperature tolerances and optimal pitching times.